
2: Greenwich village maisonette: schematic design
With the prep work done and a clear understanding of the existing space, we moved into the Schematic Design phase. Now the task was to turn our client’s wish list and the realities of the site into tangible design options. This is the creative heart of the early project – exploring layouts, forming the big ideas, and testing what’s feasible.
Think of Schematic Design as the bridge between lofty aspirations and hard technical reality. It’s where we ask “What if…?” but then immediately follow with “Can we really?”. Every sketch and diagram at this stage was checked against building codes, structural constraints, and landmark restrictions. For instance, could we move the kitchen to a different floor? Could we add luxurious rain-shower heads in a building from the 1840s? Schematic Design is about broad-strokes solutions and ensuring the bold ideas can actually work.
Collaborating With RKV Design
One huge advantage on this project was that the client’s interior designer, RKV Design, was involved from the very beginning. The interior design team had already developed preliminary style concepts and a vision board with the homeowners. We as the architects didn’t come in cold – we were able to build on their insights about the client’s aesthetic and functional goals.
During Schematic Design, the collaboration between architecture and interior design looked like this:
• We studied RKV’s initial sketches and mood boards and incorporated their ideas about layout adjacencies and style. They might suggest, for example, an open great-room feel or a particular placement for a study nook, and we would take those ideas and check how they fit with structural walls and mechanical needs.
• Together with the client, we made a list of “must-haves” and “nice-to-haves.” The client’s must-haves included a dedicated home office space, a more modern open kitchen, and making the duplex as accessible as possible for the future (they plan to live here long-term). Nice-to-haves were things like maintaining a guest room, adding a powder room, and integrating smart home features subtly.
• We constantly cross-referenced technical constraints from Pre-Design. For instance, if an interior concept was to enlarge a bathroom, we’d check our 3D scan data and condo rules to verify we had the headroom and legal clearance to do it. If RKV proposed floor-to-ceiling cabinetry on a wall, we’d recall which walls had hidden pipes or beams from our survey and adjust accordingly.
This early and frequent cross-pollination between interior design and architecture ensured that our schematic layouts were not only beautiful on paper but also grounded in practicality. It also set the stage for a smooth design process later – fewer last-minute clashes between where a structural column must go and where a piece of millwork was envisioned, for example.
“Pro Tip: Involving an interior designer from the start can greatly enhance the outcome. We found that finishes and furnishings were considered alongside walls and windows, leading to a more cohesive design. Plus, early interior input reduces the risk of “uh-oh” moments where an interior element conflicts with a structural or code requirement – those got caught and solved in Schematic Design.”
Key Challenges & Discoveries
Challenge 1: Floor Plan Discrepancies Come to Light
Those 6–12 inch differences in dimensions that our Matterport scan revealed? This is where they started to matter. At the Schematic Design stage, we were laying out rooms and locating fixtures, and we quickly saw that in a landmarked NYC duplex, a few inches can have domino effects:
A bathroom plan that looked fine on the old drawings suddenly didn’t meet code clearances when we applied real measurements. For instance, the distance from a toilet centerline to a wall or the spacing for a doorway might have fallen short by a small margin, enough to violate building code or make the space feel cramped. We adjusted layouts to ensure compliance and comfort, sometimes swapping the swing of a door or shifting a vanity a few inches.
We had to be strategic in how we carved out mechanical chases (the vertical shafts that carry pipes and ducts). Given the discrepancies, some walls were thicker or thinner than expected, and not all “assumed” chases existed. We identified a new location for a primary chase that would serve the relocated kitchen and upstairs laundry, one that wouldn’t encroach on the neighbours. This required careful measuring – something we could do confidently thanks to our precise 3D model.
The overall layout had to be fine-tuned so every square foot was used. In modern luxury design, dead space is wasted, especially in New York. Those extra inches we discovered in some areas became opportunities: we expanded a closet here, widened a doorway there. Conversely, where rooms were slightly smaller than presumed, we found ourselves modifying built-in designs to ensure they fit (for example, adjusting a bookshelf unit’s width).
In short, Schematic Design forced us to confront reality: no assumption from old plans went unchecked. By redesigning using the true base dimensions, we avoided what could have been nasty surprises during construction (like discovering a new bathtub doesn’t fit in the alcove because the wall was closer than thought!). This upfront diligence is a hallmark of doing things right in a historic renovation.

The previous kitchenette located on the lower floor
Challenge 2: Relocating the Kitchen (and Ventilation Solutions)
One of the most significant design moves we considered was moving the main kitchen upstairs. Originally, the primary kitchen was on the lower level of the duplex (with a small kitchenette upstairs). The client dreamed of having the kitchen on the upper floor, adjacent to the living and dining areas, with easier access to the rear courtyard for outdoor entertaining. It made sense socially, but could we make it work technically?
Key considerations for the kitchen relocation included ventilation and structure:
Mechanical Ventilation: NYC building code requires a kitchen with a stove to have a ventilating exhaust hood. In an apartment, this often means a duct to the exterior (roof or an outside wall) with a fan. To move the kitchen upstairs, we needed to route a duct from the new kitchen location up through the building to the roof. Our engineers confirmed it was feasible if we utilized an existing chimney flue chase for part of the run and installed an in-line exhaust fan that met the required airflow. We coordinated with the condo board and an HVAC engineer to ensure the exhaust outlet on the roof would be discreet and not visible from the street (important for Landmarks approval).
Structural Feasibility: Cutting a new 8-inch round duct hole through the masonry walls and wood joists of an 1840s building isn’t something you do lightly. The structural engineer analyzed the proposed path for the ductwork. We found we could go up through a thick closet wall and then the attic, avoiding any major beams. A few minor wood joists needed to be doubled up around the new openings for reinforcement. The calculations showed the structure would safely accommodate these changes with the added supports specified.
Plumbing & Gas: Moving the kitchen also meant running new plumbing lines (hot, cold, and a waste line for the sink) and a gas line for the range to the new location. The plumbing had to pitch properly to tie into the building’s drain stack. Luckily, one of the main plumbing stacks was not far from the proposed kitchen (adjacent to what was a bathroom), so we could connect into that with relative ease. For the gas line, we coordinated with the utility and building to extend the line upstairs, which required careful fire-stopping and sealing between floors for safety.
Landmark Considerations: We prepared a strategy to make the new kitchen vent look as unobtrusive as possible. We specified a flush roof cap painted to match the roof and placed it towards the rear of the building. Since the building is in a historic district, we included notes for LPC that this vent would not be visible from the public way (we even did a quick visualization to confirm sightlines). Thus, we anticipated getting a staff-level LPC approval for this mechanical addition.
After working through these items, we were confident enough to include the “kitchen swap” as a primary design direction in the schematic plans. It offered a huge lifestyle improvement for the client (an open kitchen connected to the living space and outdoor terrace), and technically we found ways to mitigate the challenges. This decision also had ripple effects on space planning – the former downstairs kitchen could be repurposed into a wet bar or guest kitchenette for entertaining in the garden level, adding value in its own right.
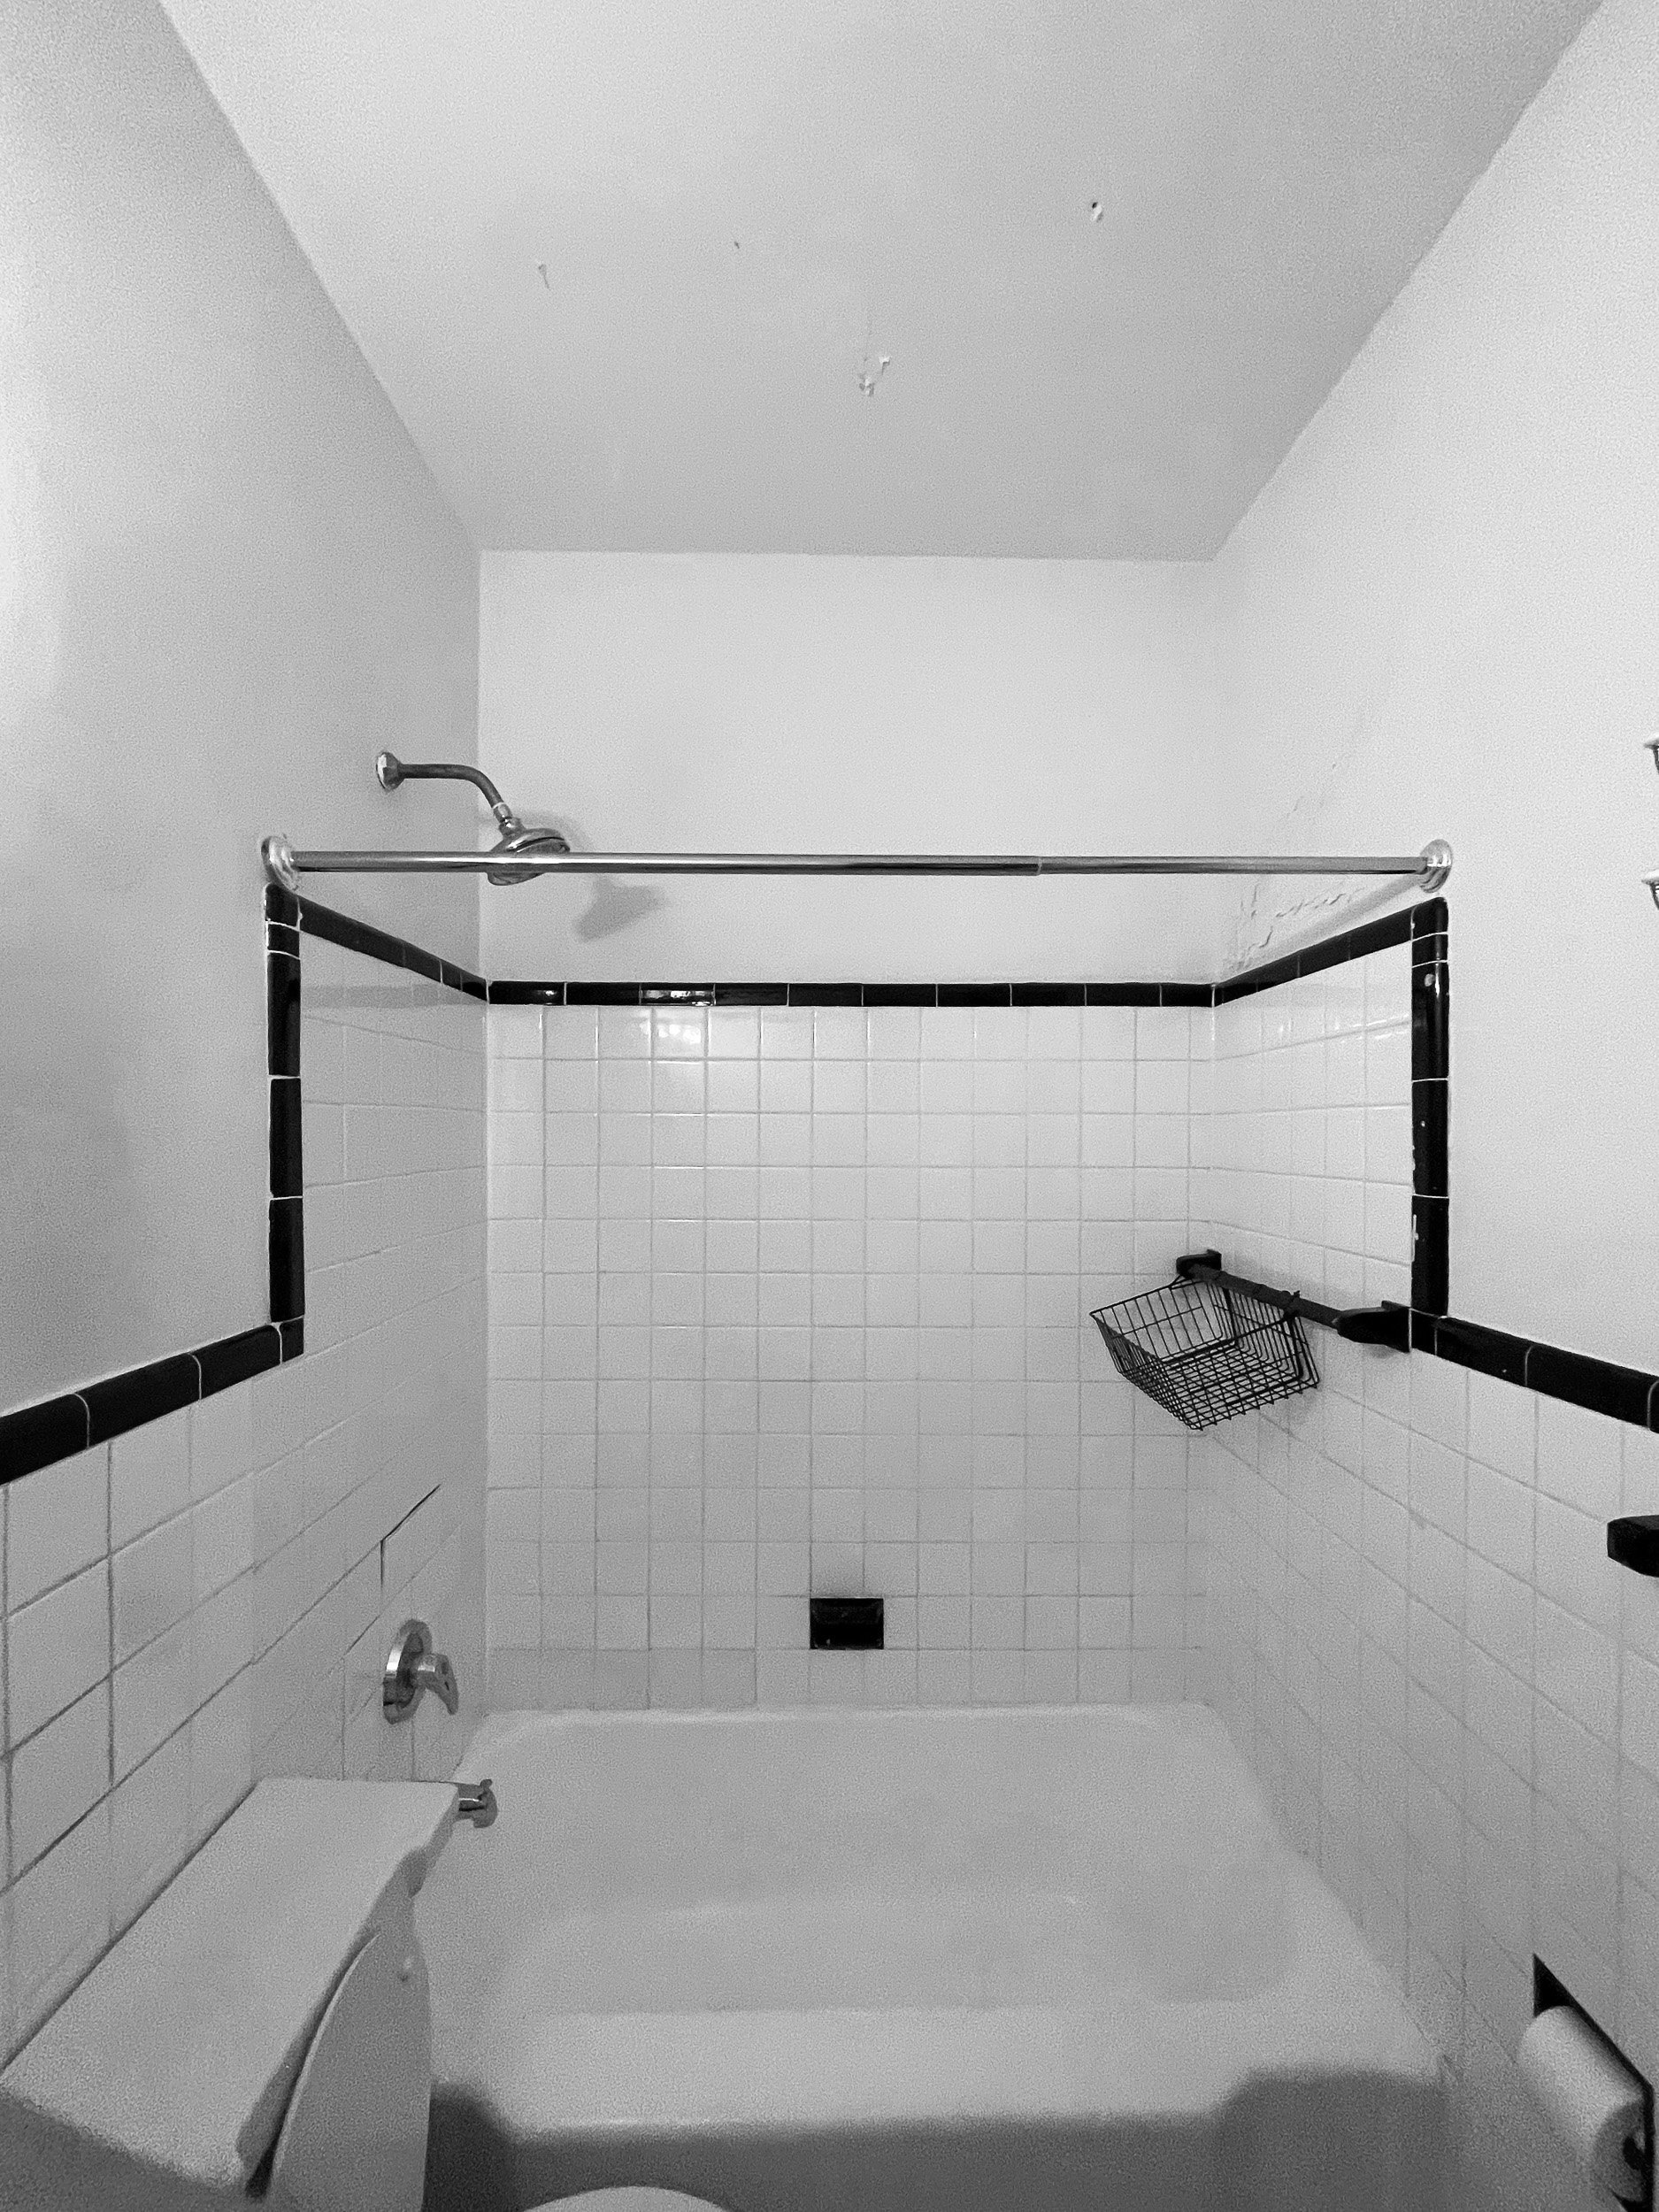
Challenge 3: Upgrading Bathrooms with Spa Features
The client’s vision included transforming the home’s bathrooms into spa-like retreats – think rainhead showers, body sprays, and sleek modern fixtures. However, integrating modern luxury plumbing into a 19th-century building required careful planning:
Water Pressure: Old buildings often have weaker water pressure or smaller diameter piping than modern systems demand. Multiple rain showerheads (which typically require a good flow rate) running at once can strain a building’s supply. We analysed the existing water service and determined that we should upsize some of the piping within the unit to maintain pressure. Additionally, we coordinated with building management to ensure the overall plumbing risers had enough capacity. In some cases, we’d consider a booster pump, but for this duplex, it wasn’t necessary after our calculations – the pressure was adequate once we replaced some older, partially clogged lines.
“Wet-Over-Dry” and Bathroom Location: We had one bathroom on the upper floor, which we wanted to enlarge and reconfigure. Directly below it was part of the client’s lower level (still their property, not a neighbour’s living room), which made it much easier to rearrange fixtures without violating building policy. That said, we still followed good practice: we added extra waterproofing measures (like an under-membrane and a floor drain) just to be safe, and we ensured the new layout was reviewed by the condo’s architect for approval.
Drainage and Venting: Adding features like multiple showerheads meant more gallons per minute of water potentially going down the drains. We verified that the existing drain lines (the “wet stacks”) could handle the increased flow. We also made sure each new fixture location had proper venting to avoid any gurgling or slow drains – which sometimes means strategically tying vent lines into an existing vent stack or using modern venting techniques like air admittance valves (allowed in some cases in NYC, though we prefer to use conventional vent piping if possible).
By planning these plumbing upgrades during Schematic Design, we avoided designing something that the building’s infrastructure couldn’t support. It also set the stage for smooth discussions with the condo board and DOB later – we could confidently show that “Yes, these fancy rain showers will work here without flooding your neighbor or compromising the building.”
Challenge 4: Planning for Accessibility and Future Needs
While our clients are currently young and mobile, they intended this to be a long-term home. We also know that good design in high-end residences often considers universal design principles – making the home comfortable for people of all ages and abilities. We looked for ways to future-proof the duplex during Schematic Design:
We identified where we could widen doorways to at least 34–36 inches. For example, the door to the master bathroom was narrow; by tweaking the layout we made sure a wider door could be accommodated in the new design. Wider doors are easier for everyone to use (and could fit a walker or wheelchair if ever needed decades down the line).
In the bathrooms, we planned shower layouts that could later accept grab bars and a bench, which ofcourse was also required by code because we’re on what is (by code) defined as the ground floor in a multi-family building. During construction, we would install blocking (solid wood backing) behind the tile walls at key locations (such as near the shower valve and by the toilet), even if we weren’t installing the grab bars now. This way, if the clients ever need them, it’s a simple retrofit with no wall demolition.
Thinking about these elements early didn’t drastically change the look of our schematic plans, but it influenced dimensions and clearances. It’s much easier to design a wider hallway or an accessible shower upfront than to try to retrofit one later. The clients appreciated this foresight – it underscored that we were planning for the long term, not just for the immediate moment.

Animation of the stages of design from the Original, to Demolition, to Construction.
Developing Multiple Layout Options
Schematic Design is an iterative process. Rather than pinning everything on one idea, we typically present the client with 2–3 layout variations to consider. For the Greenwich Village maisonette, we developed three primary schemes for the overall layout:
Option A: Minimal Changes: This scheme kept most walls and plumbing in place. It was the most cost-effective and least invasive, with fewer chances to upset the condo board or LPC. We still improved the flow (opened the wall between kitchen and dining, enlarged a doorway to the living room), but we did not relocate kitchens or baths. The downside: it offered the least “wow” factor or functional change. It was essentially a gentle update of the status quo.
Option B: Moderate Reconfiguration: This became our favoured direction. Option B proposed moving the main kitchen upstairs (as discussed), combining two small bathrooms into one large master bath, and creating a proper home office by borrowing some space from an oversized bedroom. It required moderate structural work (a couple of new beams, new plumbing lines) but nothing outrageous. We felt it struck a balance between preservation and transformation—it mostly respected the historic rooms’ placements but improved how the home was used day-to-day.
Option C: Major Overhaul: We explored more aggressive changes in this scenario. This included removing a portion of a bearing wall on the lower level to create one big open living/guest space, and installing a modern glass enclosure around the staircase to create a dramatic double-height atrium feel. It also imagined a brand new powder room under the stairs. Option C promised a “showpiece” home but came with more risks: heavier construction, higher cost, and more elements for Landmarks and the board to chew on. We kept it on the table for discussion, but everyone understood it was the most ambitious route.
We prepared plans and a list of pros/cons for each option. In meetings with the client (and via video calls, since one homeowner was travelling), we walked through how each plan would look and feel:
Aesthetic Impact: For example, Option A preserved all original room delineations, which was truer to the historic layout, but also meant you’d still have to walk through a narrow hall to get to the kitchen. Option B opened things up more, showing off the beautiful windows and letting light flow through the space – a clear aesthetic win while still keeping historic features like the main stair hall intact.
Budget Considerations: We had rough budget estimates attached to each option. Option C, with the most drastic changes, was at the high end of the budget spectrum (due to structural work and more custom features). Option A was the lowest cost. Option B was mid-range and seemed to offer the best value: significant improvements for a reasonable cost increase.
Approval Likelihood: We also discussed which scheme would most likely sail through approvals. We anticipated the condo board and LPC would be more comfortable with Options A or B, which maintained more of the original plan and didn’t, for instance, alter the exterior. Option C might have raised more eyebrows (e.g., adding large glass elements can sometimes be an LPC concern on interiors). Being part of the condo board, the client had insight here and tended to agree – the moderate plan would be easier to justify to their neighbours.
By the end of Schematic Design, Option B (moderate reconfiguration) emerged as the frontrunner. It offered modern living improvements (open kitchen, better bathrooms, defined office) while respecting the building’s character and not breaking the bank. Importantly, because we vetted those bold moves against codes and structure already, we had confidence this scheme was achievable.

Integrating Historic Character into the Design
Throughout Schematic Design, even as we sketched new layouts and proposed modern amenities, we were constantly asking: How do we preserve and celebrate the 1840s character of this home? At this phase, integrating historic elements was more about concept placement and intent, which we would detail later. Some strategies included:
We identified which original architectural features would remain focal points. For example, the beautiful Tudor-style diamond-pane windows in the living room were a gem – in every scheme, we arranged the furniture and layout to showcase those windows (no built-in cabinets obscuring them, and in one option, we even centred the living room seating to face that wall). We drew little vignette sketches of how new crown molding or ceiling coffers could align with those window frames elegantly.
The grand stairway in the duplex, with its ornate railing, was another historic highlight. In schematic drawings, we ensured that any new partition walls or added doors did not cut off views of the stairs. Option B included a glass transom above a new office wall, specifically to carry your eye through to the stairwell’s full height. The message: the staircase remains a starring element in the renovated home.
We planned to reuse and repurpose certain historic materials. For instance, we intended to keep some original doors with unique trim. In the schematic layouts, we noted which doorways would retain their original doors (perhaps with refinishing) and which new doorways would get salvaged vintage doors to match.
Any intervention that might affect historic elements was annotated even at this stage. We had a preliminary conversation with LPC staff (informally) about running a concept by them: removing a non-original wall to expand the master bathroom. They indicated it likely wouldn’t be an issue since it didn’t affect the exterior or a publicly significant interior, but it was good to gauge their stance early.
In short, we treated the historic features as assets, not obstacles. By weaving them into the schematic plans from the beginning, we set a tone: this renovation wasn’t about gutting the old – it was about lovingly rejuvenating it. Schematic drawings included little call-outs like “Original fireplace to remain – new stone hearth to be added” or “New built-in cabinets to have moulding profile echoing existing window trim.” We promised ourselves and the client that the final design would pay homage to the home’s past.
Client Collaboration & Feedback
Schematic Design was a very interactive phase with our clients. We don’t disappear into an ivory tower and come back with finished plans – instead, we involve the homeowners in reviewing and refining the concepts. Here’s how we collaborated during this stage:
We set up regular check-in meetings, often via video conference (since the clients travelled frequently). At each meeting, we presented the latest drawings or 3D sketches. Using screen-sharing and mark-up tools, we could walk them through every room in Plan A vs Plan B, for example, and mark any tweaks live as we talked. This visual communication was key in helping them understand the differences and make decisions.
We encouraged the clients to visualise daily life in each scenario. “Imagine you’re coming home with groceries in Option B – you walk in here, drop your coat there, and the kitchen’s right nearby for convenience.” This storytelling approach surfaced a lot of practical preferences. For instance, through these talks the clients realized they valued having a small mudroom area by the entry (to stash shoes and umbrellas) – so we made sure to carve that out in the plan.
The interior designer joined many of these discussions too, which was immensely helpful when talking about aesthetic themes. We’d discuss questions like: If we open this wall, how will we furnish the extended space? or Should the new kitchen have a contemporary look or a vintage flair? The design team brainstormed bridging the Greek Revival/Italianate details of the home with a cleaner, contemporary palette. Ideas emerged such as using a transitional style for millwork (not ultra-modern, but simpler than true 1840s replicas) and incorporating one or two antique pieces of furniture as accents against otherwise modern decor. This ensured a cohesive vision early on.
Throughout these dialogues, the clients were very engaged and often pleasantly surprised by the technical side that came up. One client remarked:
“I thought Schematic Design would be just a bunch of pretty drawings, but we ended up discussing plumbing chases, vent fans, and even how to preserve that 1840s front door. Seeing how creativity and logistics married together really amazed me!”
By the end of Schematic Design, we had achieved several things: the clients felt heard and saw their input reflected in the chosen direction, we (the architects) had a solid game plan that we knew was feasible, and all parties were excited about moving forward. We had our roadmap (Option B refined with some favourite ideas from A and C folded in), and next, it would be time to drill down into the details.
““I thought Schematic Design was just a bunch of pretty drawings, but we ended up discussing plumbing chases, exhaust fans, and even how to ensure we respect that 1840s front door. It’s the marriage of creativity and logistics that really amazed me!””
Mini-Checklist: Schematic Design
-
Begin this phase only after confirming that your plans reflect reality. We updated our “as-built” drawings with the 3D scan data so that every wall and dimension in the schematic design was built on truth, not guesswork.
-
Develop 2–3 distinct schemes to explore different possibilities. Include the status quo as a baseline (if only minor changes were made) and more transformative options. This gives clients perspective on the range of outcomes and associated costs.
-
For each concept, do a quick structural and code review. If Option C requires removing a load-bearing wall, sketch out what beam or column would be needed. If Option B creates a third bedroom, check egress requirements for that room. Early feasibility checks save you from presenting something that later turns out undoable.
-
Alongside the plans, prepare a high-level budget comparison. You don’t need contractor pricing at this stage, but use square footage costs and known big-ticket items to give the client a sense (“Option A might be $$, Option B $$$, Option C $$$$”). This keeps design discussions grounded in reality.
-
Mark on the schematic drawings any historic features to preserve or highlight. This can be as simple as noting “existing decorative ceiling medallion remains” or drawing a dashed line where an original archway is to be retained. Starting this early avoids accidental erasure of these elements in later detailed drawings.
-
Schedule regular meetings to go over the evolving plans. Use sketches, mood images, or 3D renderings to help the client visualize changes. Encourage them to voice concerns or wishes (“We need more closet space,” “Can we keep that original built-in cupboard?”) and incorporate that feedback. Document any decisions or preferences that come out of these meetings for reference in the next phase.
-
If you anticipate any aspect of the design might raise eyebrows with the condo board or Landmarks, consider an informal check-in. In our case, we quietly ran the kitchen move by the board president (also our client) and floated the concept to a Landmarks staffer. Early buy-in can smooth the formal approval process later.
-
Conclude the phase with a clear agreed-upon direction. The client should formally approve the chosen schematic plan (perhaps with a few minor adjustments noted). This sign-off is important before we invest significant time and money in detailed drawings. It’s essentially the green light that “Yes, this is the design we want to develop.”
Looking Ahead: Design Development
With the schematic design approved, we moved into the next phase: Design Development, where those big ideas are refined into detailed plans, materials are chosen, and all the engineering pieces are coordinated. Now, the real nitty-gritty work would begin, turning the concept into a constructible reality.